前言
Hugo 是目前流行的开源静态网站生成器中的一个,使用它生成最终的静态页面放在 Web 服务器上即可完成部署。
通常来说,可能是工作流是这样:本地写文章 -> 本地构建页面 -> 上传 public 文件夹到云服务器。这个步骤有些繁琐,而本文简化了构建和上传步骤。
这里,我们介绍如何基于 Github Actions 自动构建静态页面并发布到云服务器上实现页面自动更新内容。
本文基于 Stack 主题的 CaiJimmy/hugo-theme-stack-starter 模板,这样帮我们省事不少,因为自带了 Github Actions ,我们只需要修改模板里的 .github/workflows/deploy.yml 文件即可实现自动发布到云服务器上。
前置条件:
当然,其他主题也会有类似的快速开始的模板,大同小异。
实现步骤
修改 .github/workflows/deploy.yml 文件:
 1
 2
 3
 4
 5
 6
 7
 8
 9
10
11
12
13
14
15
16
17
18
19
20
21
22
23
24
25
26
27
28
29
30
31
32
33
34
35
36
37
38
39
40
41
42
43
44
45
46
47
48
49
50
51
52
53
54
55
56
57
| name: Deploy to Cloud Server
on:
push:
branches: [master]
pull_request:
branches: [master]
jobs:
build:
runs-on: ubuntu-latest
permissions:
# Give the default GITHUB_TOKEN write permission to commit and push the
# added or changed files to the repository.
contents: write
steps:
- uses: actions/checkout@v3
- name: Cache Hugo resources
uses: actions/cache@v3
env:
cache-name: cache-hugo-resources
with:
path: resources
key: ${{ env.cache-name }}
- uses: actions/setup-go@v4
with:
go-version: "^1.17.0"
- run: go version
- name: Setup Hugo
uses: peaceiris/actions-hugo@v2
with:
hugo-version: "latest"
extended: true
- name: Build
run: hugo --minify --gc
- name: Deploy to cloud server
uses: burnett01/rsync-deployments@6.0.0
with:
# -a: 表示以归档模式进行同步,保留文件的所有属性和权限
# -v: 表示输出详细的同步过程信息
# -z: 表示在传输文件时进行压缩,以减少传输时间和带宽
# -r: 表示递归地同步目录及其子目录
# --delete: 表示在目标目录中删除源目录中不存在的文件
switches: -avzr --delete
path: ./public
remote_path: /home/nginx/html/
remote_host: ${{ secrets.DEPLOY_HOST }} # 远程主机 IP
remote_port: ${{ secrets.DEPLOY_PORT }} # ssh 端口,默认为 22
remote_user: ${{ secrets.DEPLOY_USER }} # ssh user
remote_key: ${{ secrets.DEPLOY_KEY }} # ssh 私钥(云服务器创建密钥,下载的key.pem文件)
|
代码里有详尽的注释,这里还是展开介绍一下吧。如果你熟悉 Github Actions 的话,其实应该很好理解。不熟悉的话也没关系,照抄就行了。
重点在于最后一步:
 1
 2
 3
 4
 5
 6
 7
 8
 9
10
11
12
13
14
15
| - name: Deploy to cloud server
uses: burnett 01/ rsync-deployments@6.0.0
with:
# -a: 表示以归档模式进行同步,保留文件的所有属性和权限
# -v: 表示输出详细的同步过程信息
# -z: 表示在传输文件时进行压缩,以减少传输时间和带宽
# -r: 表示递归地同步目录及其子目录
# --delete: 表示在目标目录中删除源目录中不存在的文件
switches: -avzr --delete
path: ./public
remote_path: /home/nginx/html/
remote_host: $ {{ secrets.DEPLOY_HOST }} # 远程主机 IP
remote_port: $ {{ secrets.DEPLOY_PORT }} # ssh 端口,默认为 22
remote_user: $ {{ secrets.DEPLOY_USER }} # ssh user
remote_key: $ {{ secrets.DEPLOY_KEY }} # ssh 私钥(云服务器创建密钥,下载的 key. pem 文件)
|
使用 burnett 01/rsync-deployments 工作流,原理就是利用 Linux 的 rsync 命令将文件同步到对应的云服务器。
remote_path就是指云服务器上的站点挂载目录,比如我这里使用的 nginx ,挂载目录是 /home/nginx/html/
remote_host 指云服务器的公网 IP
remote_port是 ssh 登录的端口,默认是 22,如果自己修改过,填上对应的端口即可
remote_user就是指云服务器的用户名
remote_key 云服务器的密钥,这个需要注意,不是 ssh 登录密码,而是通过云服务器厂商的控制台创建的密钥。比如,我这里用的是阿里云的服务器,在云服务器 ECS 页面,网络与安全 - 密钥对这里创建一个,会得到一个 xxxx. pem 的文件,保存好这个文件,后面会用到。
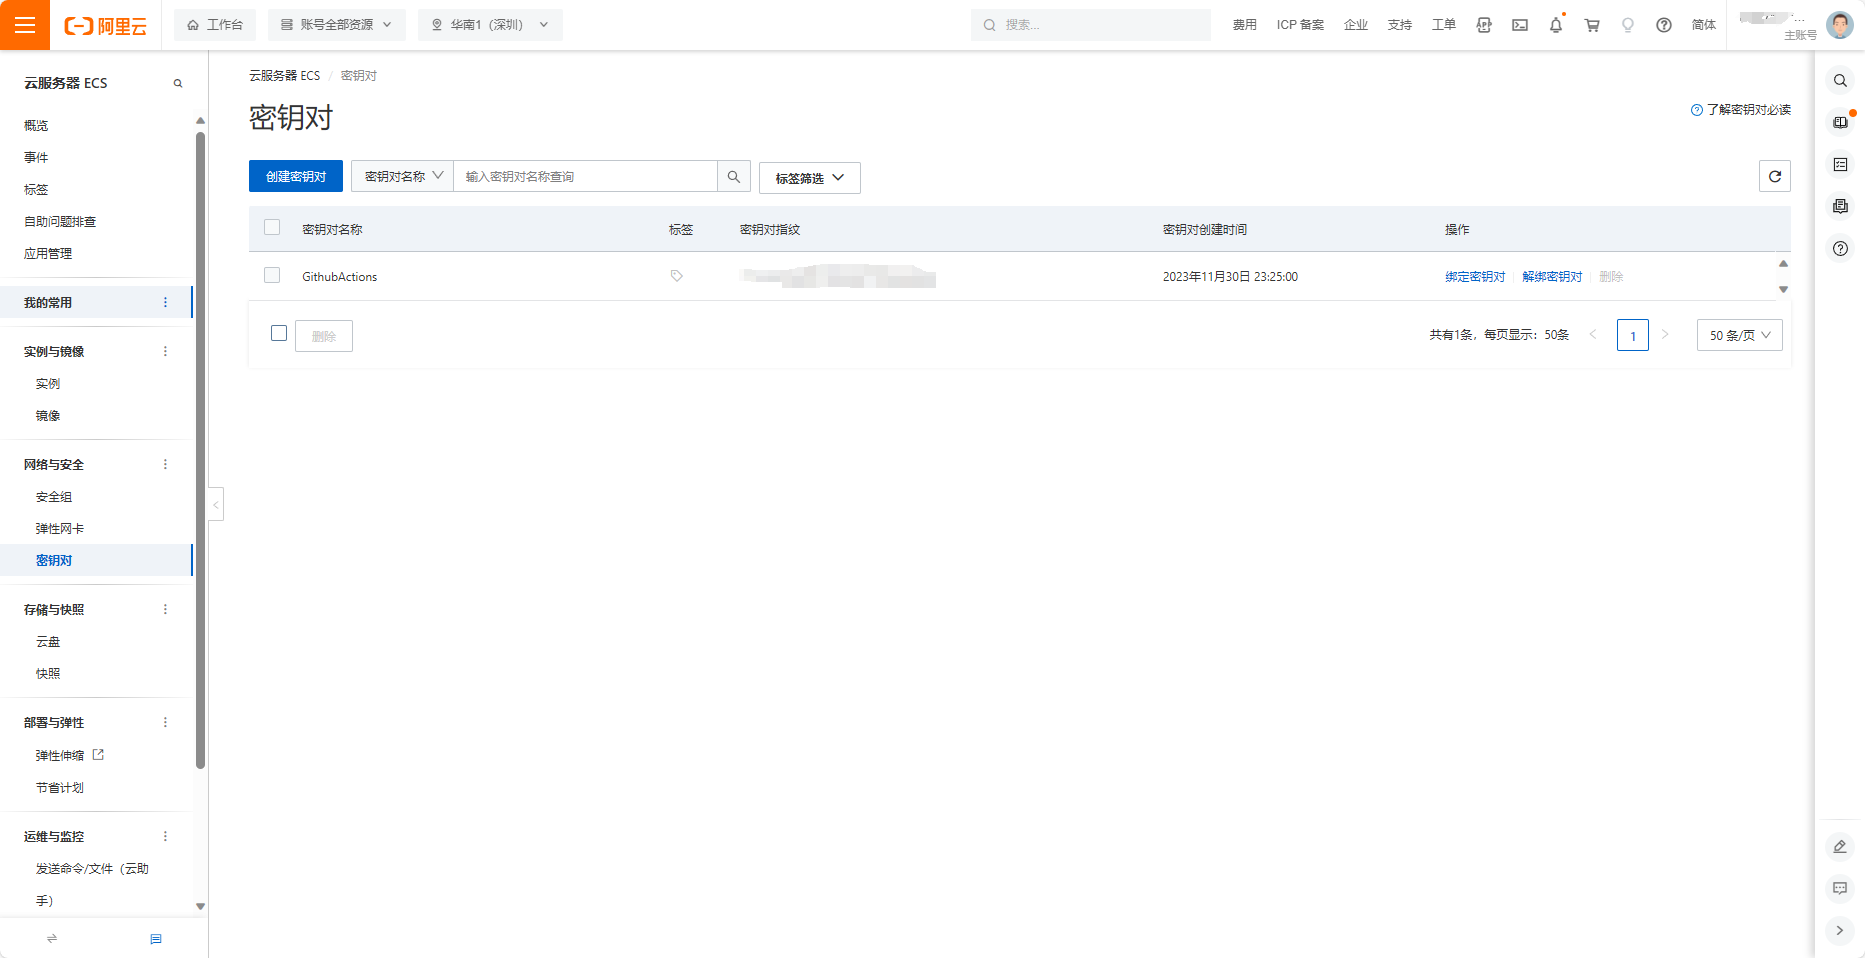
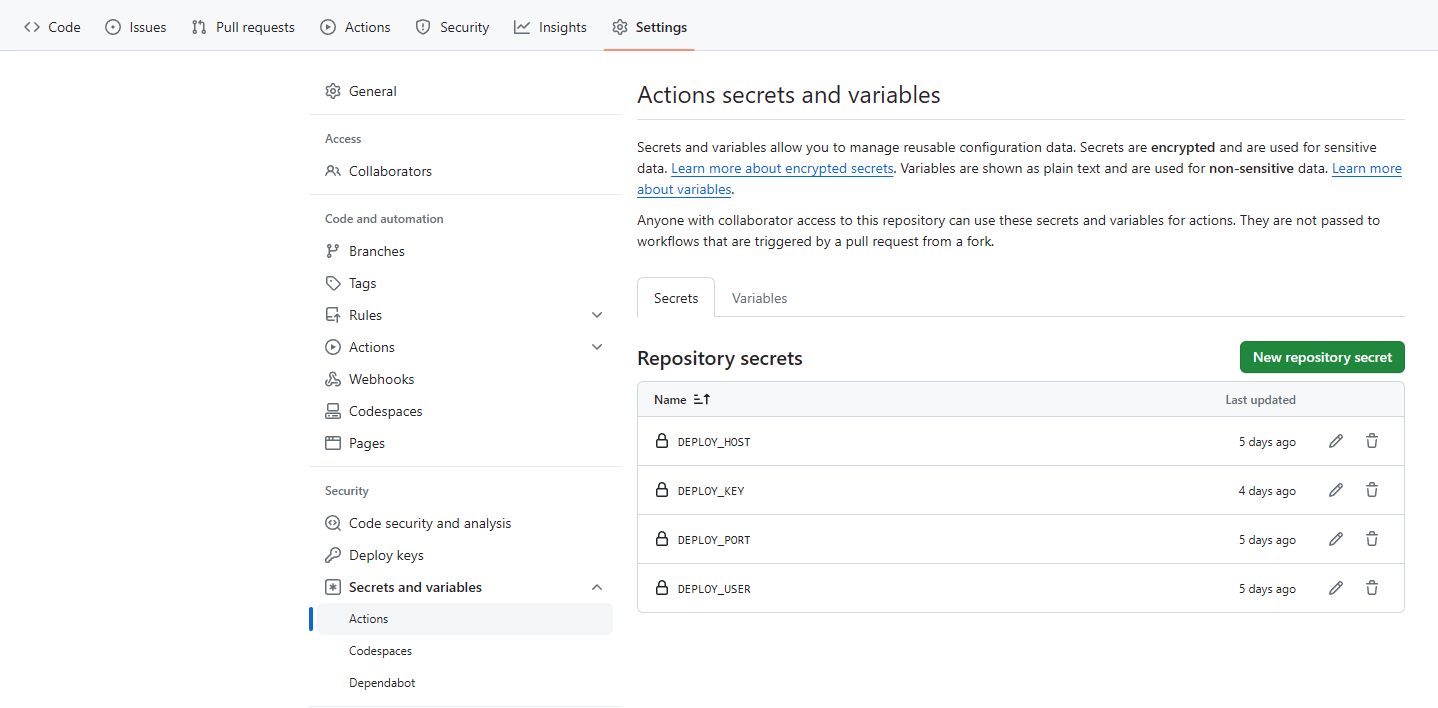
然后,前往 GitHub 博客仓库,在 Settings - Secrets and variables - Actions 界面添加 secret key。
创建 secret:
- DEPLOY_HOST 填入公网 IP
- DEPLOY_PORT 填入 ssh 端口
- DEPLOY_USER 填入用户名
- DEPLOY_KEY 填入 xxx. pem 文件的内容
之后,登录自己的云服务器,查看是否安装 rsync,同时查看是否处于运行中:
1
2
3
4
5
6
| ~# systemctl status rsync
○ rsync. service - fast remote file copy program daemon
Loaded: loaded (/lib/systemd/system/rsync. service; disabled; vendor preset: enabled)
Active: inactive (dead)
Docs: man: rsync (1)
man: rsyncd.conf (5)
|
Active: inactive (dead)就说明未启动,我们设置为开机自动:
1
2
| systemctl enable rsync
systemctl start rsync
|
然后再使用 systemctl status rsync 可以看到:
 1
 2
 3
 4
 5
 6
 7
 8
 9
10
| ~# systemctl status rsync
○ rsync. service - fast remote file copy program daemon
Loaded: loaded (/lib/systemd/system/rsync. service; enabled; vendor preset: enabled)
Active: inactive (dead)
Condition: start condition failed at Thu 2023-11-30 23:29:42 CST; 3 days ago
└─ ConditionPathExists=/etc/rsyncd. conf was not met
Docs: man: rsync (1)
man: rsyncd.conf (5)
Nov 30 23:29:42 ecs systemd[1]: Condition check resulted in fast remote file copy program daemon being skipped.
|
多了 Condition: start condition failed at Thu 2023-11-30 23:29:42 CST; 3 days ago这一行之后,就可以使用了
验证
1
2
3
| git add -u
git commit -m "add actions"
git push
|
git 三部曲之后前往 GitHub 查看结果
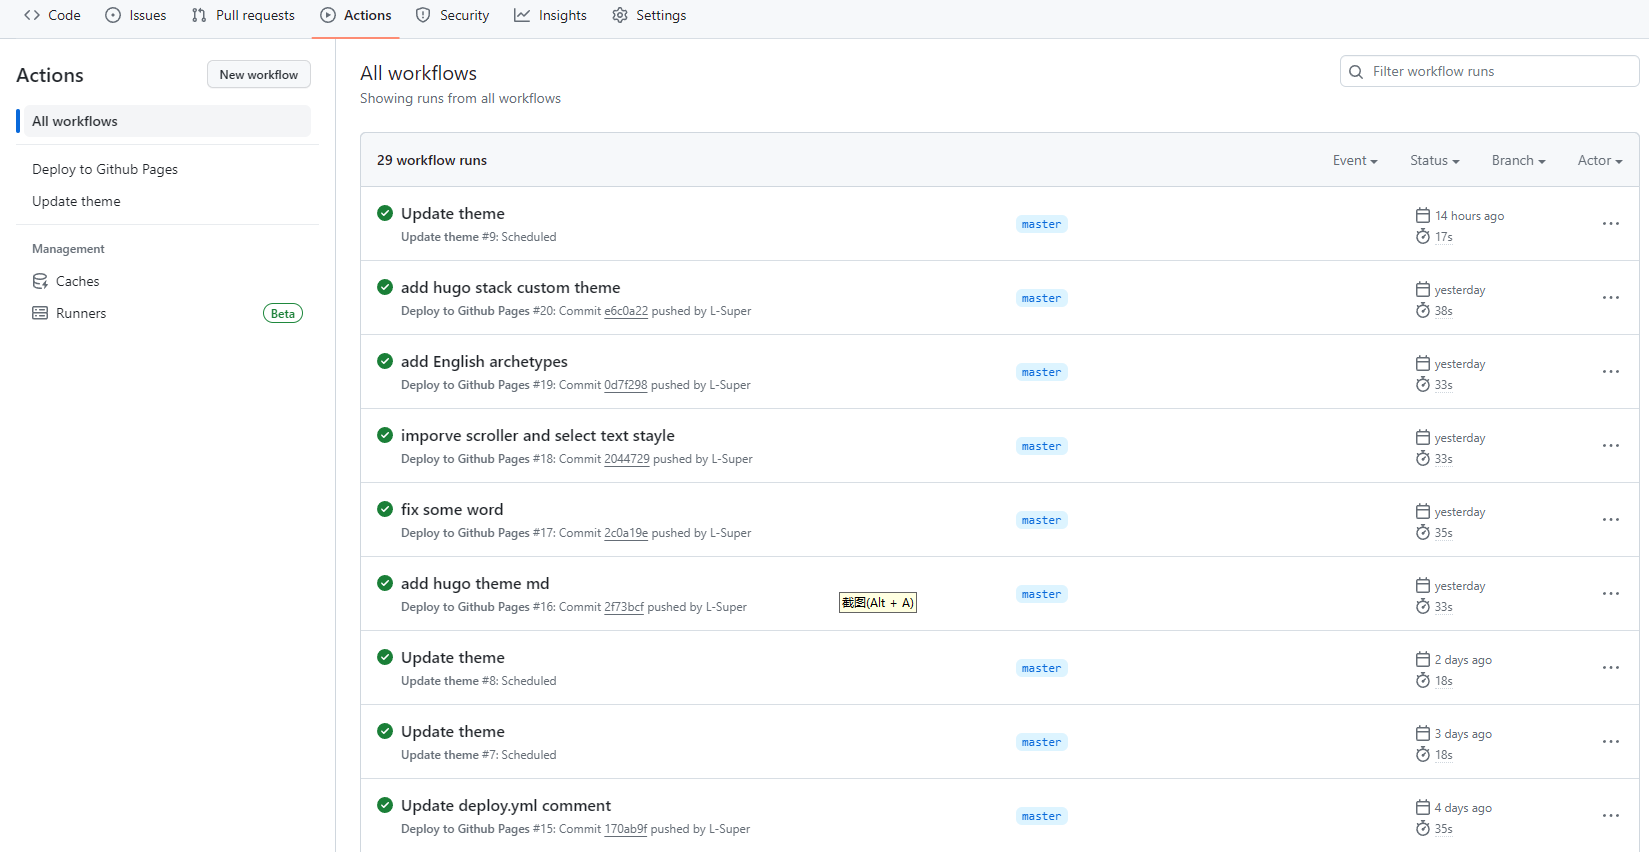
同时,可以查看自己的博客是否已经更新。
总结
本文介绍了 Github Action 自动构建发布到云服务器上的方法,当然也可直接发布到 GitHub Pages 上,由于这样更简单,可直接参考 基于 Github Action 自动构建 Hugo 博客 - (lixueduan.com) 。
基于 Github Action 自动构建 Hugo 博客 - (lixueduan.com)
